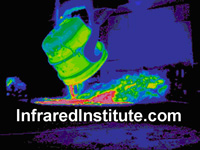
 Infrared Thermography is the technique that uses a remote infrared imaging camera to record the invisible infrared energy being emitted from an object into a two dimensional picture.Thermal, or infrared energy, cannot usually be detected with the human eye because the wavelength is too long for the sensors in our eyes to detect it. Infrared radiation forms part of the electromagnetic spectrum and we often perceive it as heat.
All objects above absolute zero emit infrared electromagnetic energy. Even cold objects, such as ice cubes, emit infrared radiation, but, the higher the temperature of an object, the greater the amount of infrared radiation that is emitted. The Infrared camera allows us to see what our eyes cannot!
In the industrial/commercial environment, almost everything gets hotter or cooler prior it failure, making infrared instruments an extremely valuable diagnostic tools with many diverse applications. As industry strives to increase manufacturing efficiency, manage energy usage, improve product quality, and enhance worker safety, new applications for infrared cameras will continually emerge.
How Does the Camera "See" Heat?
All objects, cold or hot, radiate heat in the form of infrared radiation. As an object increases in temperature, it radiates more energy, and the wavelength gets shorter. Infrared radiation, visible light and ultraviolet light are all forms of energy in the electromagnetic spectrum. The only difference is their wavelength or frequency of wavelength.
The human eye can only see a narrow range of wavelength in the electromagnetic spectrum. These wavelengths range in length from 0.4 to 0.7 microns, a micron is one millionth of a meter. Most of the time, the human eye will perceive reflections as energy from the sun or an incandescent light bulb is reflected off a target object. If the temperature of an object gets hot enough, above about 525°C a small amount of energy moves into the visual spectrum and we will see it. An example would be a burner on an electric stove “glowing” red. In fact any time an object will emit or reflect energy in the same frequency, in which the human eye is sensitive, we will see it. Mostly, however we see reflections!
Infrared cameras are calibrated within a specific temperature range. A typical example would be; -20 to 500°C, and can be extended down to -40°C, and up to 2000°C. The camera converts the invisible infrared signal into a two-dimensional visual image and displays this on a standard LCD monitor. Most industrial cameras can also make temperature measurements, with manufacturers stating accuracies to around ±2% at 30°C. The thermal information is stored onto a disc and is later downloaded into a computer to create a report.
Infrared Inspections are Simple!
Operating thermal imaging cameras is quite easy these days, just push the auto button and there is an image! This is simple on the surface, but the reality is different. The real work — and value — is the thermographer knowledge about the application, how it operates, the heat transfer processes within and to the surface of the object, how to adjust the camera to enhance the thermal details necessary to evaluate the image once it is stored and downloaded onto the computer. Then prepare a report that is accurate, clearly presented and is easy to read by the maintenance personnel, who often do not know anything about infrared Thermography. As in any method of nondestructive testing, the interpretation of the information gathered takes both education and experience. This is NOT a “point and shoot” technique, as most camera manufacturers would like you to believe!
This is an image of the same components. The left image indicates no problem, the one on the right showing a serious thermal anomaly! Why? There are several reasons how this can happen, a thermographer must thoroughly understand all the variables or should not be doing the inspection.
Infrared Training and Education
The above outlines the reasons why a training course by field experienced trainers is vital to any person doing thermography field inspections. The courses teach people how to fully utilise the infrared camera and software, how to gather accurate data, and, how to correctly interpret the data and present the information in a clear understandable format.
What Is Certification?
A certificate is a piece of paper you can receive just by attending a Training Course. But for certification to mean anything, the agency granting that certification has to insure that the candidate is qualified.
How is this accomplished?
ISO & IRT based Certification.
Students can gain certification two ways.
(1) 5 Steps to ISO Certification. (3rd party certification)
(2) 5 Steps to Institute of Infrared Thermography Certification (2nd party certification)
IRT certification based on ASNT SNT-TC-1A.
1. Attend a four day training course.
2. Pass the end of course examination based on infrared theory, practical workshops and application knowledge.
3. Conduct a set of practical workshops using an infrared camera to develop qualitative and quantitative images
4. Students document 100 hours practical field experience at their workplace.
5. Students send a typical report for evaluation to complete the certification process.
Steps to ISO Certification.
ISO examinations are based on ISO 18436 and administered by BINDT (British Institute of Non Destructive Testing) through the PCN accreditation process. ISO examinations take place at registered examination centers and independent invigilators complete the examination process.
1. Candidates shall have a combination of education, training and experience to ensure that they understand the principles and procedures applicable to thermographic measurement and analysis.
2. Candidates provide documentary evidence of successful completion of a BINDT approved or recognised course of formal training. (IRT is an accredited training organisation for BINDT)
3. The minimum duration of training for L1 is 33 Hours.
The training syllabus includes a requirement for practical knowledge and practical skills training
4. Candidates must maintain a log of hours and nature of work, especially scanning times, on PCN documents CP16-CM for levels 1
Minimum Cumulative Experience Requirements is 12 months
Level 1 requires 400 hours practical experience
5. Application for Level 1 qualification examination is made on PCN form PSL/57-CM.
Qualification Examination Level 1.
Number of Questions. 60
Time (Hours) 1.5
Passing Grade 75%
Essential Reading Material
Level Title Author Publisher Reference
1, 2, 3
ASNT Level 3 Study Guide- Infrared and Thermal Testing Method
H Kaplen American
Society of Non
Destructive
Testing, 2001
ISBN
1571170154
1, 2, 3
Safe Thermal Imaging of Electrical Systems
C.
Pearson UK
Thermography
Association, 1997 Application
Guide AG/97
1, 2, 3
Thermal Imaging of Building Fabric
C.
Pearson
BSRIA ISBN
086022-590-9
1, 2, 3
Common sense approach to thermal imaging
G C
Holst
Society of
PhotoOptical
Instrumentation
Engineers, 2000
ISBN
0819437220
3
Condition-based Maintenance using Non-Destructive Testing: Application Guide AG 1/2003
C Pearson A Seaman
BSRIA
ISBN 860226115
1, 2, 3
Infrared Thermography-Theory & Practice
N Walker
BINDT
0903132338
1, 2, 3
Infrared Thermography-Applications
A Nowicki
BINDT
090313232X
1, 2, 3
Measurement in Thermography
C. Ohman
FLIR Systems AB
1557498 Rev A
(A copy of the essential reading material and standards are available during the course)
Standards, codes and specifications
1. British Standard (BS) ISO 13374. Part 1. 2003. Condition monitoring and diagnostics of machines- Data processing, communication and presentation: Part 1. General Guidelines
2. BS ISO 13372: 2004, Condition monitoring and diagnostics of machines- vocabulary
3. BS ISO 17359: 2003, Condition monitoring and diagnostics of machines- general guidelines.
4. ISO 13379: 2003, Condition monitoring and diagnostics of machines- Data interpretation and diagnostic techniques. - General guidelines
5. CMGEN: 2004, General requirements for qualification and certification of condition monitoring and diagnostic personnel.
6. ISO/FDIS 13381-1, Condition monitoring and diagnostic of machines; prognostics: Part 1 general Guidelines
7. ISO 18436-1: 2004, Condition monitoring and diagnostics of machines; requirements for training and certification of personnel. Part 1, Requirements for certifying bodies and the certification process.
8. BS EN ISO/IEC 17024: 2003, Conformity assessment- general requirements for bodies operating certification of persons.
9. ISO/DIS 18434-1. Condition monitoring and diagnostics of machines. Thermography. Part 1: General procedures.
The Institute of Infrared Thermography is an Associate Member
Of the British Institute of Non-Destructive Testing and Provides
Certification Training based on the PCN Certification Scheme,
ISO 18436 and the American ASNT SNT-TC-1A standard.
For further information and training course details please visit
www.infraredinstitute.co.uk
Telephone: 00 44 (0) 151 424 4060
This email address is being protected from spambots. You need JavaScript enabled to view it.

